
close
Choose Your Site
Global
Social Media


Views: 0 Author: Site Editor Publish Time: 2026-08-23 Origin: Site


Relying on dashboard sensors or waiting for an audible brake squeal is a dangerous game. It often results in irreversible rotor damage before you even notice a problem. Proactive measurement prevents escalating repair costs. You gain control over your vehicle safety.
Our goal is to transition from subjective visual guessing to precise, quantifiable measurement. Knowing the exact thickness of your brake linings helps you make definitive replacement decisions. You avoid discarding good parts too early. You also prevent the catastrophic failure of waiting too long.
This guide covers accurate measurement techniques for both disc brake pads and drum brake shoes on standard passenger vehicles. We will explore the exact tools you need. You will learn to read the data correctly. By following these steps, you ensure your braking system remains reliable under all driving conditions.
Evaluating your braking system requires a clear starting point. Factory-new brake linings for standard passenger cars typically start between 10mm and 12mm. Heavy-duty trucks might use thicker pads, but passenger cars rely on this standard range. This initial thickness provides optimal heat dissipation. Thick friction material absorbs thermal energy during aggressive stops. As the material wears down, it loses this thermal mass. Thinner pads transfer more heat into the caliper piston and brake fluid. This can cause dangerous brake fade on steep hills.
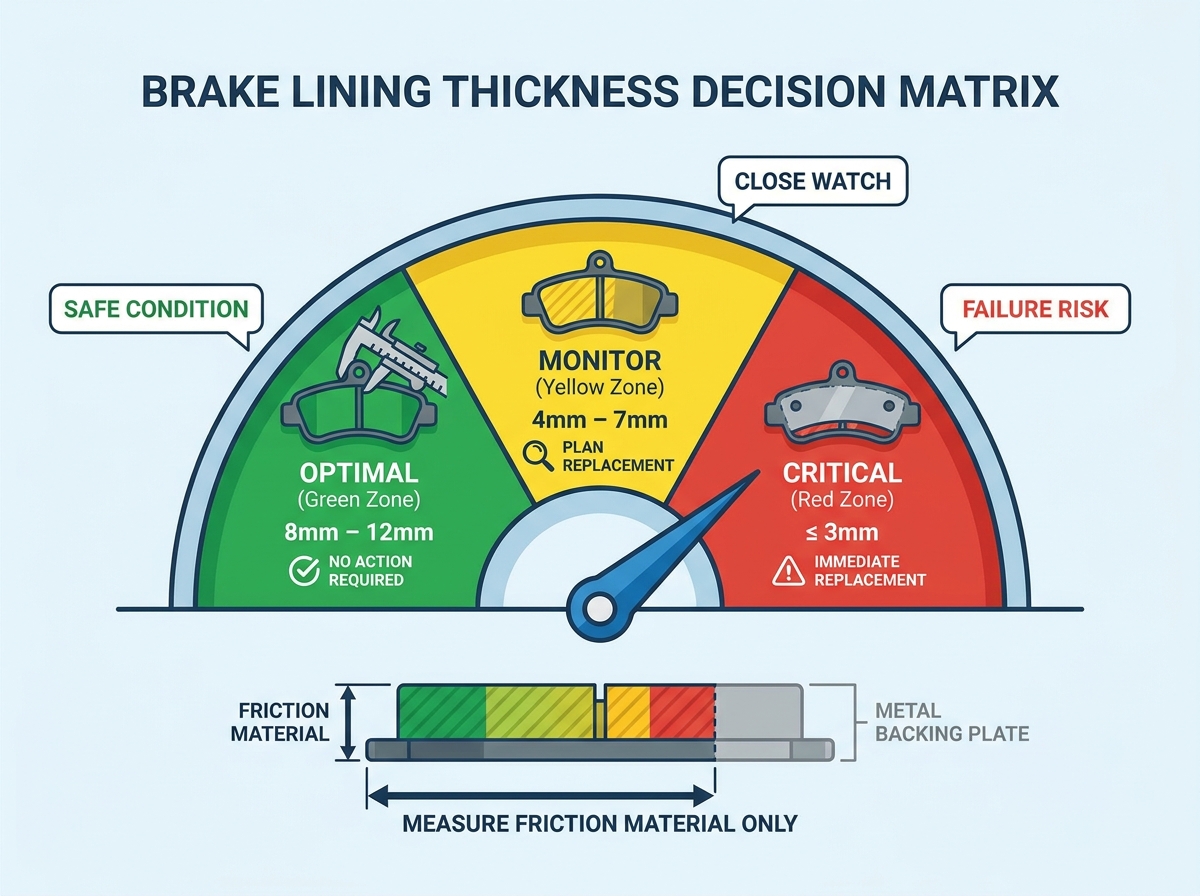
Industry experts rely on a standardized decision matrix. This matrix links the remaining thickness directly to a safety outcome. You can use this framework to plan your maintenance schedule effectively. It removes the guesswork from vehicle inspections.
Brake Lining Wear Matrix
| Wear Zone | Thickness Range | Outcome & Required Action |
|---|---|---|
| Green Zone | 8mm – 12mm | Optimal condition. Maximum stopping power available. No action required. |
| Yellow Zone | 4mm – 7mm | Monitor closely. Safe for daily commuting. Plan for replacement before long road trips or heavy towing. |
| Red Zone | 3mm or below | Critical failure risk. Immediate replacement required. Prevents metal-on-metal rotor scoring and ensures compliance. |
You must also consider the manufacturing style of your brake pads. Modern vehicles use either bonded or riveted friction materials. Bonded pads use high-strength adhesives to secure the friction material to the backing plate. You can safely run bonded pads down to the 3mm threshold. Riveted pads use copper or brass rivets to hold the material in place. Riveted pads require a more conservative approach. You should replace riveted pads at around 4mm. Pushing them further exposes the rivet heads. These metal heads will instantly gauge deep grooves into your expensive brake rotors.
Visual inspections can deceive even experienced mechanics. Dirt, shadows, and constrained angles hide the true condition of your pads. You need verifiable data to make safe decisions. Obtaining this data requires specific measurement tools.
The brake lining thickness gauge remains the industry standard for quick compliance checks. These manual tools feature color-coded metal blades. The blades represent the Green, Yellow, and Red zones discussed earlier. You slide the appropriate blade between the brake rotor and the pad backing plate. If the red blade (often 2mm or 3mm) fits into the gap, the pad has failed. This tool provides rapid, reliable checks without deep technical knowledge. Most auto parts stores sell these gauge sets inexpensively.
Digital or vernier calipers offer the ultimate precision. Calipers capture exact millimeter readings during a wheel-off inspection. They allow you to measure wear down to the decimal point. This precision becomes essential when diagnosing mechanical issues. Calipers help you compare the exact thickness of the inboard and outboard pads. They also help you track wear rates over time accurately. A digital caliper instantly converts between inches and millimeters, speeding up the diagnostic process.
Many online automotive forums promote the "straw method." This user-generated hack involves sliding a plastic drinking straw against the brake pad through the wheel spokes. You mark the straw with a pen to estimate the pad depth. This trick offers a fast, wheel-on visual check. It can tell you if you have plenty of pad left. However, it lacks serious precision. The straw method cannot account for uneven wear on the hidden inboard pad. You should never use visual estimation hacks for final replacement decisions. Rely strictly on calibrated gauges or calipers when safety is on the line.
Your safety takes priority before any tools touch the vehicle. Proper preparation prevents severe injuries. First, park the vehicle on a flat, level concrete surface. Engage the parking brake fully. Place heavy-duty wheel chocks behind the rear tires. Use a high-quality hydraulic floor jack to lift the vehicle at the factory-designated pinch welds. Always support the vehicle with correctly rated jack stands. Never rely on the hydraulic jack alone to hold the vehicle weight.
Brake systems generate extreme friction and heat. Rotors can easily exceed 400 degrees Fahrenheit during a standard commute. Allow the braking system to cool entirely before beginning your inspection. Touching a hot caliper or rotor will cause severe thermal burns. Wait at least one hour after driving before pulling the wheels.
Measurement requires extreme attention to detail. Many beginners measure the wrong parts of the assembly. Follow these steps carefully to secure an accurate reading.
You must measure both sides of the brake rotor. Calipers utilize an inboard pad (piston side) and an outboard pad (spoke side). Failing to measure the inboard pad frequently leads to false positives. The inboard lining typically wears faster because the hydraulic piston applies initial force directly to it. If you only check the outboard pad, you might miss a dangerously thin inboard pad. Always verify both sides for a complete safety assessment.
Rear drum brakes require an entirely different inspection approach. Standard disc calipers leave the friction material exposed. Drum brake shoes house the lining completely inside a cast-iron drum. You cannot measure drum shoes without significant disassembly.
Accessing the shoe lining starts with removing the rear wheel. Next, you must pull the brake drum off the wheel hub. This step often presents challenges. Years of heat cycling and road salt cause severe rust adhesion. The drum may stick stubbornly to the hub center. Do not strike the drum violently with a steel hammer. This can shatter the cast iron. Instead, locate the threaded extraction holes on the drum face. Thread M8x1.25 bolts into these holes. Slowly tighten them evenly. The bolts will safely press the drum off the hub.
Once the drum is off, you will see the primary and secondary brake shoes. Use a digital caliper to measure the thinnest point of the shoe lining. Place the caliper jaws strictly on the friction material. Ignore the curved metal shoe frame. Record the measurement exactly as you would for a disc pad.
You must account for the tapered design found on many OEM brake shoes. Manufacturers often taper the ends of the friction material to reduce brake squeal. The edges will naturally measure thinner than the center. Always take your measurement at the thickest central point of the shoe arc. Additionally, the primary shoe (facing the front of the car) may feature thinner material from the factory than the secondary shoe. Consult your factory service manual to verify the original specifications before condemning the shoes.
Collecting the measurements represents only half the job. You must analyze the data to determine your next mechanical steps. Wear patterns tell a detailed story about your braking system health. Compare your recorded numbers against the scenarios below.
Taking the time to analyze these wear patterns saves money. It prevents premature wear on your newly purchased parts. It also highlights hidden hydraulic issues before they cause a total loss of braking power on the highway.
Quantifying brake lining thickness removes the guesswork from routine vehicle maintenance. Taking objective measurements guarantees your vehicle remains safe under extreme conditions.
Take action this weekend. Acquire a proper color-coded lining gauge or a digital caliper. Secure your vehicle, pull the wheels, and perform a verifiable measurement of your braking system. If you lack the required tooling or a safe workspace, schedule a verified wheel-off inspection with a certified technician immediately.
A: No. Measurement applies strictly to the wearable friction material. Including the backing plate will falsely inflate your measurement by 4mm to 6mm. This common mistake masks a dangerous condition, leading you to believe your brakes are safe when they actually require immediate replacement.
A: Yes, on vehicles with wide-spoke alloy wheels. You can often slip a brake lining gauge through the spokes to check the outboard pad. However, measuring the inboard pad usually requires wheel removal. The inboard pad often wears faster, making wheel-off inspections crucial for total safety.
A: The inboard lining sits directly against the hydraulic piston. This piston applies the initial braking force. A slight variance is perfectly normal. However, a difference of more than 2mm suggests sticky caliper slider pins. These pins require immediate cleaning and high-temperature lubrication.
A: Regulations vary widely by jurisdiction. State inspection laws in the US or MOT standards in the UK often set the legal minimum at 1.5mm to 2mm. However, industry best practice mandates replacement at 3mm. This ensures reliable stopping power and prevents brake fade under heavy loads.


